5.13.2013

Fast & Easy DIY Pull-String Pinata Tutorial

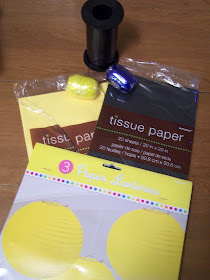
When searching for a pinata for Oscar's batman party, we couldn't find anything we liked (we weren't crazy about the idea of smashing batman's head open for some dubble bubble).  We looked around the party supply store and Jeremy asked if maybe I could make something out of one of these lanterns - challenge accepted!


Pinata supplies:

  • Paper Lantern - I used round, but I'm guessing any shape would work.
  • Tissue paper in desired colors
  • Coordinating ribbons
  • Wire cutters
  • Scissors
  • Glue
  • Uh.. yeah.. that's it.  This is really easy.


Cut the ribbons into pieces to use as pull strings. I believe these were about 4ft.  Length depends on how high you are hanging the pinata and how short your kids are. If you aren't sure you can make them longer than you think you will need and then trim them to where you like them once the pinata is up.


This particular lantern is made with a spiral of wire covered in paper. I'm guessing some might be made of separate circles of different sizes, in which case you can skip this step.  In fact, if you're not worried about some kid pulling down the vent cover that you tie your pinatas to, you might be fine without this step. Cutting the wire will make the bottom just pop off if it's pulled hard enough. If your lantern is just one long piece of wire, count a few spirals down to where you want the bottom of the pinata to open up.


Using a pair of wire cutters which are hopefully a bit daintier than these (my teeny wire cutters were missing, so Jeremy's came to the rescue), snip the wire.


If you're using gigantic wire cutters like mine, you'll have something that looks like this. No worries.


Now, on the opposite side of the lantern, closer to the bottom of the pinata, cut two slits in the paper parallel with the wire, just big enough to slip a ribbon through. The cut wire is by my thumb and the cut paper slits are by my middle finger.


Slits in the paper, wire intact. 


Put the ribbon through the paper and tie it around the wire.  This will be the winning ribbon.


Winning ribbon is tied on.  Pulling this ribbon will rip the bottom off of the pinata.


Now that the ribbon is tied on, you can glue a couple layers of tissue paper on the bottom to close off the hole.  It's best not to do this until the ribbon is tied, otherwise it makes it a lot harder to tie it.


Now you glue on the rest of the ribbons.  Since they are just glued on they will pop off when pulled.


Use some decorative fringed tissue around the top of the ribbons to hide the winning ribbon from view.


If you want you can continue decorating from here.  You could make this into all sorts of fun things depending on the shape of the lantern and the tissue you decorate it with.  Since this was a project I hadn't even planned on doing (remember how I was looking to buy a pinata..), I just added some bat symbols for Oscar's batman party and called it a day.


And here is the finished product. I went ahead and made all three lanterns into pinatas, cuz the more the merrier, right?  And what else would I do with 2 yellow paper lanterns?  Well that worked about perfect (yay!) since we only had 3 kids at the party (boo!). They each had their own pinata!


First pinata down! It worked perfectly.


And here is pinata #2 spewing forth goodness.  These were the perfect solution for us.  The ONLY problem I found with them was that anything pointy (sucker sticks) can poke through the lantern walls if you're not careful.  If you've built up more tissue layers by decorating the entire pinata, this most likely won't be a problem.  And it really wasn't that big of a problem to begin with.

I'd love to hear suggestions in the comments on other themes these would work well for.  I know they would be great for sports themes (baseball, basketball, soccer, golf and such). I also thought maybe you could add a brown paper cone and turn it into an ice cream cone. Or add some cotton batting and make a group of them into clouds for a rainbow party.  Leaves some ideas below!

3.22.2013

Tip for the Laundromat

If you're needing to keep lots of quarters nice and neat, $20 in quarters fits perfectly in an m&m's mini tube! We've been using these for a long time, and periodically have to replace them due to them getting broken (they are kid magnets). But I'd say there are worse things than having to eat m&m's...

3.21.2013

Rainbow Party Pictures

Stories with Aaron and Auntie

Looking sleepy with Nana

Forkpicks and fruit dip!

 Getting crafty with Daddy and Mama

Mouth crammed full of pinata chocolate

She is now a pro at present opening

Not phased by Grampa's impossible ribbons

The birthday princess

Trying to get in this big present

Kitchen!! (which sometimes gets called chicken instead..)

Making a wish

And later that night she wanted to try on all her birthday presents and be a ballerina 

and a princess

Rainbow Party Activities and Favor bags

For our party time crafting activity, we made "stained glass rainbow" paintings. Each kid got a clear sheet protector (the kind that goes in 3 ring binders) that I had cut the 3 ring side and bottom off of. That made one big clear sheet with a fold in the center. We opened those up and taped them down on a rainbow template so that they knew where to paint their rainbows. 

They painted rainbows and then we sandwiched the paint back up between the clear sheets (no worries about sending wet paint home with kiddos).

 Then we glued them between two black sheets of cardstock that had the same rainbow shape as the template.

It was a pretty fun activity, though kind of messy. 

Our next party activity was a pinata. I happened upon this rainbow #2 pinata at the party store (on sale!) and figured it was destined to be. It was the kind you hit with a bat, so it needed a little bit of tweaking to be functional for a 2 year old's party in a tiny apartment. I cut a door into the bottom, tied a ribbon to it and then covered the door with some tissue paper to keep it closed.

Then I hot glued more ribbons to the door so that they would pull off instead of opening the pinata, and added a bit more tissue paper to hide the ribbon ends so that older cousins couldn't look and see which one was the winner.

Alice LOVED the pinata.  This is her thinking really hard about which ribbon was the winner (she did pull the winning ribbon)

 Picking a ribbon

Lane pulling a ribbon 

Pinata madness. Alice thought chocolate falling from a pinata was the best thing ever. 

Each kid got a favor bag with watercolor paints, a set of rainbow paintbrushes, rainbow lollipop, skittles, etc. They used their favor bags for holding their pinata goodies as well.

3.20.2013

Rainbow Party Foods

 Rainbow party foods! I tried to stick with foods that Alice likes and rainbow/pot of gold themed things.

We had a fruit rainbow with fruit dip clouds. I was hoping to have the clouds on the same tray with the rainbow, but there wasn't a big enough tray for that. There was a LOT of candy. A pot of gold - candies wrapped in gold wrappers - rolos, werther's, snickers minis, etc. A bowl of skittles, rainbow suckers and rainbow fruit belt things.

 I used a sugar cookie recipe, divided into 6 parts and added food dye, pressed each into layers in an 8" x 8" and chilled in the fridge, then sliced them to make easy rainbow sugar cookies.

 More skittles, gold nuggets (honey-mustard pretzels), rainbow goldfish, and rainbow straws.

Our main dish was a big pot of golden mac and cheese.  Alice is all about the noodles and cheese, so this was right up her alley. 

And of course a fluffy cloud cake - 

with rainbow layers on the inside.

 And I saved the best for last - Jeremy lit up our rainbow drinks! They looked glowy and fabulous.

Rainbow Party Decorations

 The long awaited rainbow party posts!  Pardon the extra super crappy pictures, was in a rush and using an ancient camera. Here are the decorations. A happy birthday sign,

 The windows had balloon clouds with tissue paper rainbows.  

 streamer rainbow with tissue paper clouds and pot of gold on one wall

A big balloon rainbow

And a tablecloth rainbow on the ceiling. This was one plastic tablecloth of each color, cut in half lengthwise and attached to the ceiling with clear push-pins.

We also used folded tablecloths with a white one on top to make a table skirt but still leave the tabletop white so that it didn't get too busy with the colorful food. 

A few instagram photos of all the rainbow goodness.

This was post party.  These decorations stayed around a long time because they made me happy.

A nighttime view of our rainbow windows from outside.   

Rainbowy goodness!